In some cases the client does not want to display/see out-of-the-box search results. For example the client wants to have a search functionality only on a specific document library or wants to see all the related links by a particular author. In this case it makes sense to display the search results grouped by author. Below we will try to display the search results web part grouped by author.
Step 1. In search centre page(where you have placed search box and search results web part), click on ‘Site Actions’ and ‘Edit Page’.
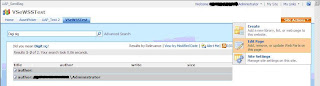
Figure 1. Click on ‘Edit Page’. (Since I have already modified the ‘Search Core Results’ web part, you are able to see group by result.)
Step 2. For ‘Search Core Results’ web part, click on ‘modify shared web part’
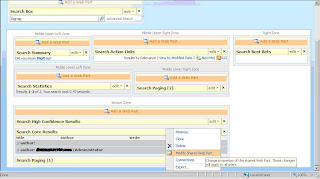
Figure 2. Click on ‘Modify Shared Web Part’ for ‘Search Core esults’.
Step 3. Click on ‘XSL Editor…’ button. Copy all the text available. Now open notepad and paste all the content in it. Save the file as ‘SearchAll.xml’.
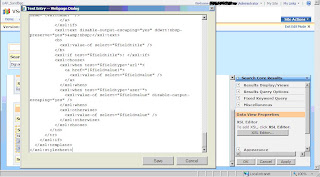
Figure 3. Click on ‘XSL Editor…’ button and copy the text available.
Step 4. Open SharePoint designer, Open any test site. On the test site, right click and create a new .ASPX page.
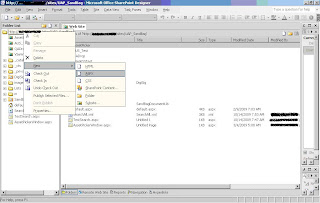
Figure 4. Click on ‘New’ -> ‘ASPX’ from the context menu.
Step 5. Open the newly created aspx page and from the menu, click on Data View -> Manage Data Sources.
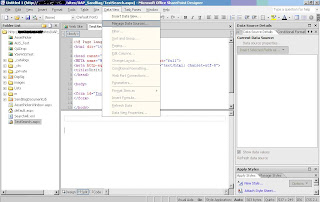
Figure 5. Click on ‘Data View’ -> ‘Manage Data Sources…’ from the menu.
Step 6. From the ‘Data source Library’ click on ‘Add an XML file’. Browse and select the ‘SelectAll.xml’ file you have saved in step 3.
Step 7. Click on ‘Show Data’ from the xml file you have just now added.
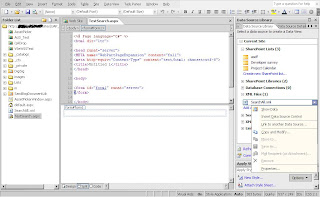
Figure 6. Click on ‘Show Data’ from the context menu.
Step 8. Now drag and drop the columns that you think are necessary for grouping information. For this example, I have selected title, author, size and write.
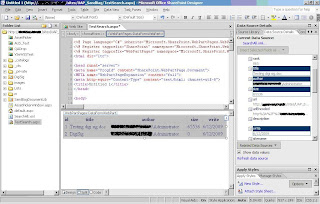
Figure 7. Drag and drop required columns on to the page.
Step 9. From ‘Common data view tasks’, select ‘Sort and Group’. Now select ‘Author’ from the available fields. And also check ‘Show group header’ property. Click on OK.
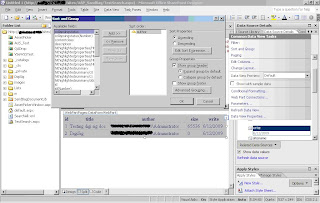
Figure 8. Click on ‘Sort and Group’ from the context menu and select ‘author’ from the available fields.
Step 10. For column title, select ‘Hyperlink’ for ‘Format as :’. Say yes to the confirm box. In the ‘Edit Hyperlink’ dialog, change the address as ‘{url}’ and text to display as ‘{title}’.
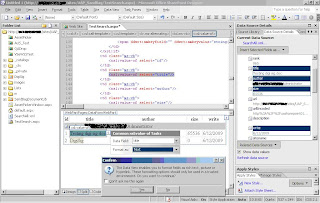
Figure 9. Select ‘Hyperlink’ from the content menu for ‘Format as:’.
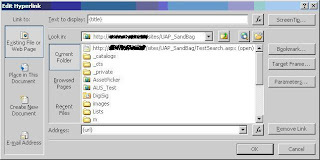
Figure 10. Edit Hyperlink dialog.
Step 11. Go to code of the .aspx page and copy all the content between
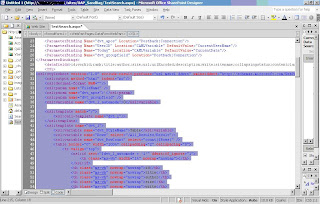
Figure 11. Select xsl stylesheet from code.
Step 12. Paste the xsl copied in to the XSL editor dialog box. Click on save and apply.
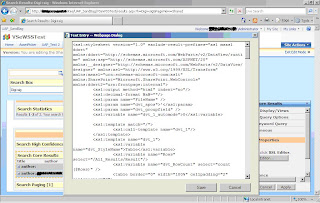
Figure 12. Paste the code onto the xsl editor.
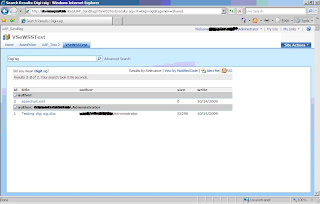
Figure 13. The result can be seen as above.
-Vighnesh Bendre
Step 1. In search centre page(where you have placed search box and search results web part), click on ‘Site Actions’ and ‘Edit Page’.

Figure 1. Click on ‘Edit Page’. (Since I have already modified the ‘Search Core Results’ web part, you are able to see group by result.)
Step 2. For ‘Search Core Results’ web part, click on ‘modify shared web part’

Figure 2. Click on ‘Modify Shared Web Part’ for ‘Search Core esults’.
Step 3. Click on ‘XSL Editor…’ button. Copy all the text available. Now open notepad and paste all the content in it. Save the file as ‘SearchAll.xml’.

Figure 3. Click on ‘XSL Editor…’ button and copy the text available.
Step 4. Open SharePoint designer, Open any test site. On the test site, right click and create a new .ASPX page.

Figure 4. Click on ‘New’ -> ‘ASPX’ from the context menu.
Step 5. Open the newly created aspx page and from the menu, click on Data View -> Manage Data Sources.

Figure 5. Click on ‘Data View’ -> ‘Manage Data Sources…’ from the menu.
Step 6. From the ‘Data source Library’ click on ‘Add an XML file’. Browse and select the ‘SelectAll.xml’ file you have saved in step 3.
Step 7. Click on ‘Show Data’ from the xml file you have just now added.

Figure 6. Click on ‘Show Data’ from the context menu.
Step 8. Now drag and drop the columns that you think are necessary for grouping information. For this example, I have selected title, author, size and write.

Figure 7. Drag and drop required columns on to the page.
Step 9. From ‘Common data view tasks’, select ‘Sort and Group’. Now select ‘Author’ from the available fields. And also check ‘Show group header’ property. Click on OK.

Figure 8. Click on ‘Sort and Group’ from the context menu and select ‘author’ from the available fields.
Step 10. For column title, select ‘Hyperlink’ for ‘Format as :’. Say yes to the confirm box. In the ‘Edit Hyperlink’ dialog, change the address as ‘{url}’ and text to display as ‘{title}’.

Figure 9. Select ‘Hyperlink’ from the content menu for ‘Format as:’.

Figure 10. Edit Hyperlink dialog.
Step 11. Go to code of the .aspx page and copy all the content between

Figure 11. Select xsl stylesheet from code.
Step 12. Paste the xsl copied in to the XSL editor dialog box. Click on save and apply.

Figure 12. Paste the code onto the xsl editor.

Figure 13. The result can be seen as above.
-Vighnesh Bendre
Comments