Adding Custom Action in Central Administration


In my last post I had mentioned about custom actions locations and IDs. In this post you will see how to add a custom action to Central Administration's Application Management.

For this we need to add 'Module' to VS 2010 SharePoint project. You can delete the text file which gets created by default when you create module. Now in the Elements.xml file add the below xml code.


This will add a custom action under Web Applications which is under Application Management.
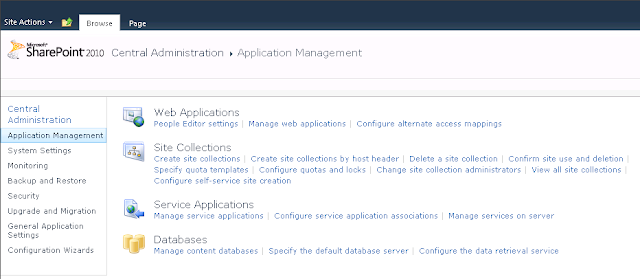


You can see 'People Editor Settings' menu under Application Management->Web Applications

- Vighnesh Bendre

Comments

Popular posts from this blog

Working with large xml files in c# .net

Working with large (huge) xml files is always a pain in the … The reason? These files can’t be loaded in to memory. On my desktop, where I have 2 gigs memory, I can’t open the file in even notepad. I was presented with a challenge recently to manipulate one such large xml file. The xml file was of 550+ MB. I know many would say I have seen bigger xml files than this. But the heart of the matter is if I can’t open 550+ MB file in notepad or in xmldocument in c#, then I can’t open any file bigger than this. And hence the logic to play with these files would remain same. The scenario: We have an xml file from which we want to remove a single node without removing its children. In the below sample xml fragment, the node has to be removed. The children nodes, must then be attached to ( node’s parent) node. One Two 100.22 GoodDay 3 4 Five 200.09 Cra

Create list view - Conditional Formatting in SharePoint Designer 2010

In this example, we are going to format a column based on certain condition. Here I already have a list called Projects. I also have workflow associated with it. So whenever I create a new item in the list, workflow status column shows ‘In Progress’. Subsequently when the workflow in completed, the workflow status column shows ‘Completed’. For demonstration purpose, I will set the background color of workflow status column to yellow when the status is ‘In Progress’ and to green when the status is ‘Completed’. In SharePoint Designer open the site on which you are working. Click on ‘Lists and Libraries’ link. Choose the ‘Projects’ list. In SharePoint Designer Navigation, choose ‘Lists and Libraries’. In the list settings page, click on ‘New’ in ‘Views’ section. Provide appropriate name for the view and click OK. After choosing list, click on ‘New’ in the Views section. Give appropriate name to the list. Now click on any column, then in the ribbon, click on List View Tools-&g

Upgrade and Migration for SharePoint Foundation 2010

      1.1 Introduction Microsoft SharePoint Foundation 2010 has been designed for scale and performance and as such requires new hardware and software requirements. There are 3 major steps while upgrading. 1. Plan and Prepare 2. Perform a database attach upgrade 3. Verify upgrade 1.2 Plan and Prepare   Before we run any process to upgrade from Windows SharePoint Services 3.0 to Microsoft SharePoint Foundation 2010, we have to determine which upgrade approach to take. In our scenario, Database Attach Upgrade seems to be appropriate approach to follow. We can upgrade the content for the environment on a separate farm. The result is that you do not upgrade any of the services or farm settings. You can upgrade the databases in any order and upgrade several databases at the same time. While each database is being upgraded, the content in that database is not available to users. 1.2.1 Upgrade Approach A database attach upgrade enables you to move to new hardware or a